
Abstract
This post documents creating a small script to create a link from an en.wikipedia page to the corresponding simple.wikipedia page, using colors to indicate if the page exists.
This project is a good example of both creating and consuming a simple REST API. (An alternative name for this post could be: “Consuming a Google App Engine Hosted Python(Flask)-based Micro-service from a TamperMonkey-Hosted Javascript function”, but that seems like a little much.)
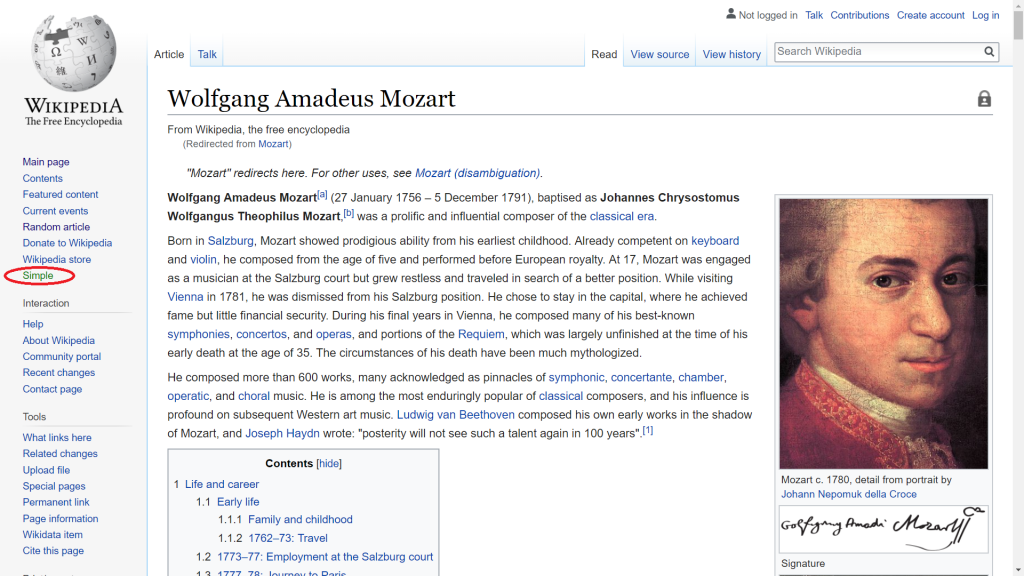
The following screen shot shows the final product:
Scope
This post documents:
- creating a TamperMonkey script
- injecting content onto a wikipedia page by manipulating the DOM
- Creating a Flask-based Python micro-service
- Deploying the micro-service to the Google App Engine, using the Google Cloud SDK
- Calling the micro-service from Javascript by using XMLHttpRequest
- Consuming the JSON returned from the micro-service
Background
This is the second post in this series, which is on finding the joy in creating simple, but useful, programs using our own two hands.
For the previous post, please see here.
Simple Wikipedia
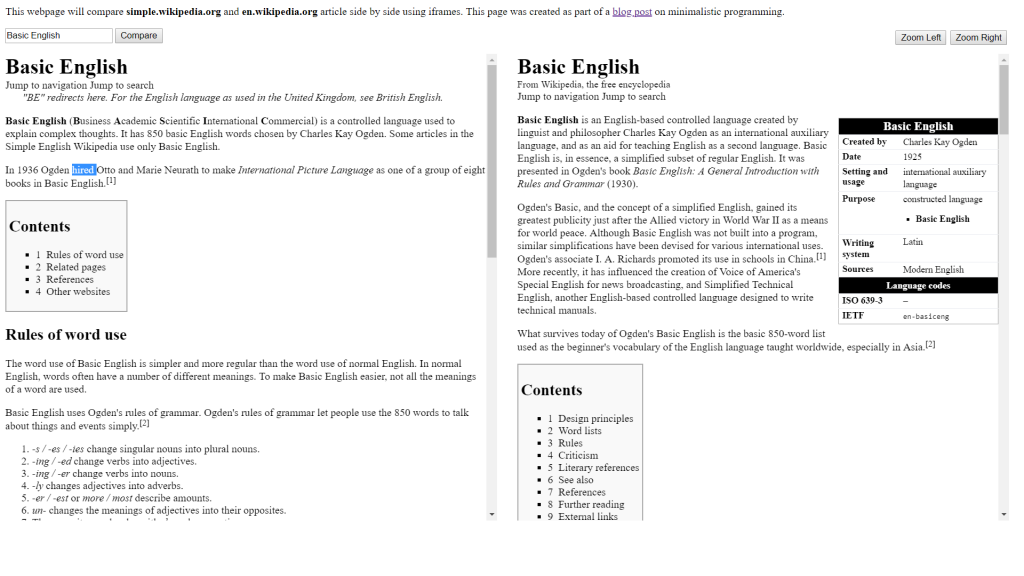
As I mentioned previously, I have started to get interested in Simple Wikipedia and plan on starting to contribute to it. The previous post in this series documented created a simple .HTML page that took a query parameter, and then displayed the corresponding pages from simple.wikipedia and en.wikipedia side-by-side.
Once I had that basic functionality in place, the next thing I wanted to do was to get a link to appear on en.wikipedia pages which linked to the corresponding simple.wikiepdia page. Additionally, I wanted the link to show up either in green (if the corresponding simple.wikipedia article existed) or in red (if no article currently existed in simple.wikipedia.)
TamplerMonkey
In a previous post, I documented how I went about creating a niche Chrome extension.
The functionality I want for this project is similar, which is the ability to inject a little bit of .HTML onto an existing web page. However, I didn’t really feel like going to the trouble of creating a Chrome extension to do this.
Instead, for this project I used TamperMonkey, which is sort of like a “meta” Chrome extension; it is a Chrome extension that allows arbitrary Javascript to be run on any we bpage.
While TamperMonkey scripts don’t have access to all the browser-specific API’s available to native browser scripts, they do have the property of being easy to prototype and implement, and are also cross-platform.
So without further ado, here is the complete TamperMonkey script I developed:
// ==UserScript==
// @name         Simple Wiki Compare
// @namespace    http://tampermonkey.net/
// @version      1.0
// @description  Add a link to en.wikipedia articles
// @author       Benjamin Pritchard
// @match        https://en.wikipedia.org/*
// @grant        none
// @require http://code.jquery.com/jquery-latest.js
// ==/UserScript==

$(document).ready(function() {
    'use strict';

    var x = document.getElementById("firstHeading");
    var article = x.innerText;
    var ul = document.getElementsByClassName("body")[0].children[0];
    var li = document.createElement("li");
    li.innerHTML = '<a id="simple" href="https://simplewikiexists.appspot.com/compare?q=' + article + '">Simple</a>';
    ul.appendChild(li);


    var xhttp = new XMLHttpRequest();
      xhttp.onreadystatechange = function() {
        if (this.readyState == 4) {
          if (this.status == 200 ) {
            var obj = JSON.parse(this.responseText);
            var simple = document.getElementById("simple");
            if (obj.response == 200) {
              simple.style = "color:green";
            }
            else {
              simple.style = "color:red";
            }
          }
        }
      };

      //make call to Google App Engine
      xhttp.open("GET", "https://simplewikiexists.appspot.com/?q=" + article, true);
      xhttp.send();

})();
The comment at the top provides some information to TamperMonkey about the script. Most importantly, the @match entry specifies which web pages to run this script on — in this case, en.wikipedia.org pages.
The script has two main parts.
TamperMonkey Script Part 1: insert HTML element
The first thing I do is grab the name of the article displayed. (I figured out how to extract this from the HTML just by poking around.)
var x = document.getElementById("firstHeading");
var article = x.innerText;
Next, I just find the links on the right-hand side of the page, and insert a new one:
var ul = document.getElementsByClassName("body")[0].children[0];
    var li = document.createElement("li");
    li.innerHTML = '<a id="simple" href="https://simplewikiexists.appspot.com/compare?q=' + article + '">Simple</a>';
    ul.appendChild(li);
As you can see, the link actually goes to the URL “https://simplewikiexists.appspot.com/compare“, the Flask Microservice that I developed and deployed to the Google App Engine that I will describe in more detail below.
TamperMonkey Script Part 2: AJAX
The second part of the script calls the same Microservice (but with a different end-point) using an XMLHttpRequest:
//make call to Google App Engine
xhttp.open("GET", "https://simplewikiexists.appspot.com/?q=" + article, true);
xhttp.send();
Additionally, a handler is setup to receive the response:
xhttp.onreadystatechange = function() {
   if (this.readyState == 4) {
     if (this.status == 200) {
        var obj = JSON.parse(this.responseText);
        var simple = document.getElementById("simple");
        if (obj.response == 200) {
           simple.style = "color:green";
        }
        else {
           simple.style = "color:red";
        }
     }
  }
};
As you can see, we just check to make sure the response is ready, and then check the HTTP status code. Assuming it is OK (i.e. 200) we take a look at the JSON returned, which is simply in the following format:
{"response": 200}
(Note: it is easy to get confused. The HTTP response from calling the micro-service is one issue; the micro-service returns a JSON-encoded response that indicates if the corresponding simple.wikipedia article exists!)
Finally, the JSON is converted into a native JS object, and the value passed back is used to turn the link we inserted either red or green.
Flask
The next thing we will cover is the micro-service itself.
Here is the complete code:
#returns JSON response to indicate if the passed in parameter exists in simple.wikipedia
#
#must be invoked with a query string
#	&q=math
#
# JSON returned is formatted like this:
#    {"response": 404}
#
# 400 = bad request
# 200 = exists OK
# 404 = doesn't exist
#
# Benjamin Pritchard
# Kundalini Software
# 1-April-2018

# [START gae_python37_app]
from flask import Flask
from flask import request
from flask_cors import CORS
from flask import render_template

# If `entrypoint` is not defined in app.yaml, App Engine will look for an app
# called `app` in `main.py`.
app = Flask(__name__)
CORS(app)

@app.route('/compare')
def compare():
	searchWord = request.args.get('q', '')
	return render_template('wikicompare.html', searchWord=searchWord)


@app.route('/')
def hello():
	import urllib3
	import json

	data = {}
	http = urllib3.PoolManager()
	searchWord = request.args.get('q', '')
	if (searchWord != ''):
		url = "https://simple.wikipedia.org/wiki/" + searchWord
		r = http.request('GET', url)
		data['response'] = r.status
	else:
		data['response'] = 400		# bad request

	json_data = json.dumps(data)
	return(json_data)


if __name__ == '__main__':
    # This is used when running locally only. When deploying to Google App
    # Engine, a webserver process such as Gunicorn will serve the app. This
    # can be configured by adding an `entrypoint` to app.yaml.
    app.run(host='127.0.0.1', port=8080, debug=True)
# [END gae_python37_app]
One thing to notice is that this code uses the Flask web framework, which wikipedia defines as “a micro web framework written in Python.”
As you can see, two “routes” [end points] are specified. The one specified with @app.route(‘/compare’) just returns the static .HTML for the file wikicompare.html that we developed in the previous post.
Notice however, that the HTML is modified slightly because it is going to be invoked via the render_template() funciton of Flask. The only difference is how wikicompare.html gets it parameters. The stand-alone version from the previous post uses query parameters, while this version uses template place-holders which are filled in by flask.
So for example, in the original code we have this:
var urlParams = new URLSearchParams(window.location.search);<br>
subject = urlParams.get('q');
In the template version we just have this:
subject = '{{searchWord}}';
The other endpoint (the one specified by @app.route(‘/’)) is more interesting:
@app.route('/')
def hello():
	import urllib3
	import json

	data = {}
	http = urllib3.PoolManager()
	searchWord = request.args.get('q', '')
	if (searchWord != ''):
		url = "https://simple.wikipedia.org/wiki/" + searchWord
		r = http.request('GET', url)
		data['response'] = r.status
	else:
		data['response'] = 400		# bad request

	json_data = json.dumps(data)
	return(json_data)
It uses the excellent library “urllib3” to query simple.wikipedia for the article in question simply by hitting the URL: https://simple.wikipedia.org/wiki/xxx where xxx is the name of the article. (Wikipedia either returns an HTTP status code of 200 or 404, depending on whether the article exists.)
Next, the script just packages the response into Python dictionary, and returns it as JSON to the caller.
Deploying to App Engine
One amazing thing about Google’s Cloud Platform is that it has a free tier! So far when writing these blogs, I have utilized two of their services.
When writing the logic to generate the code for my Chrome extension, I used their Simple Search API.
This project of course uses their App Engine.
To deploy to Google’s servers, I used the Google Cloud SDK.
Conclusion
This blog post has documented how to create a simple TamperMonkey script that consumes a simple Rest API that we created and deployed to the Google App Engine.
Often it is easy to get lost in the buzzwords of all this, but as this post has demonstrated, both developing and consuming a simple REST API is actually pretty easy.