If something is worth doing once, it is worth automating.
Unknown
(Note: the github repository for the library developed in this post is available here.)
I think being a computer programmer is a mindset; it means to think in algorithmic terms, or how to formulate problems in terms of discrete steps to achieve our outcomes.
More broadly, I think it also means to develop what I call a creator mindset, which means to conceive of ourselves as the creators of content, instead of just a consumers of it.
Adopting both an algorithmic-oriented thought process, as well the creator mindset mentioned above, leads to a shift in our perceptions, where we start to perceive the world in a different way.
First of all, it allows to to quit passively comsuming content without really even noticing it. Instead, we adopt a perspective of looking at things and wonder: “How did somebody make that? I wonder what tools they used? How would I go about creating something similar?”
Secondly, it also causes us start to see our own creative impulses come to fruition as an impetus to learn the necessary skills to get us there.
So with those thoughts in mind, let me recap one of my recent development experiences.
A few weeks ago, I wrote a blog post documenting some software I wrote called The Kundalini Piano Mirror.
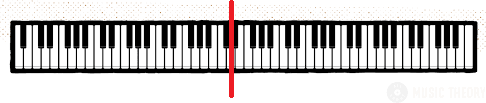
As part of that post, I was describing how a piano keyboard is symmetrical, and I just used a little picture of a keyboard I found online to illustrate:
This morning when I got up, I was reviewing my own post, and I thought to myself “wouldn’t it be cool to have a little animated .GIF to illustrate better what I mean when I say the piano is symmetrical?”
That thought set me off a day-long coding adventure, learning how to use the HTML canvas element, and then how to incorporate my work (i.e. javascript code) into WordPress sites.
So before I get to the explanation, let me first start off by showing the finished product: thanks to my work today, I am happy to report that I have now replaced the keyboard pictured above with the following:
This blog post documents my work, and illustrating my thought process and steps.
—
Avoiding Rube Goldberg
My first thought was to create an animated .GIF, and just to reference the gif in an <img> tag on in my WordPress post.
Obviously this approach would work, and I started to dig into a good programmatic (!) way to create animated .GIF files. (As an aside, my original thinking was to use Python for this, because in my opinion, Python is perfect for this type of one-off programming projects.)
So my first step was to spend a few minutes researching 2D graphics libraries for Python.
While doing this, I started to think to myself, maybe it would be simpler to just use an HTML <canvas> tag to implement this. After all, HTML canvas tags provide a simple and easily-comprehended set of 2d graphics primitives that can be worked with interactively.
So the question then became, how could I draw one frame at a time onto an HTML canvas, and then pragmatically screen shot it or something (yes Python libraries exist for this) to create the raw graphics files I concatenate using some tool to use for the frames of my animated GIF.
But even as I thought that, the “Rube Goldberg” nature of what I was proposing became clear: obviously it would be simpler to just do all the animation straight to an HTML canvas using Javascript!
So I spent the next few hours banging something out, and here is what I ended up with:
/*
 Javascript routine for drawing a piano keyboard onto an HTML canvas element, optionally coloring some of the keys red
     ctx 		- context to a canvas
     RedKeyArray - array of keys to color red (0 = low d, 87 = high c, proceeding chromatically)

	Usage:

		var canvas = document.getElementById("canvas");
		var ctx = canvas.getContext("2d");

		RedKeys = [0, 39, 43, 46];

		DrawKeyboard(ctx, RedKeys);

Benjamin Pritchard / Kundalini Software
24-Feb-2019

*/
function DrawKeyboard(canvas, RedKeyArray) {

	// general characteristics of a piano

	var TOTAL_KEYS = 88;
	var NUM_WHITE_KEYS = 52;
	var NUM_BLACK_KEYS = TOTAL_KEYS - NUM_WHITE_KEYS;

	var ctx = canvas.getContext("2d");

	var X_BORDER = 0;
	var Y_BORDER = 0;

	var width = canvas.width - (X_BORDER * 2);
	var height = canvas.height - (Y_BORDER * 2);

	var WHITE_KEY_WIDTH = (width / NUM_WHITE_KEYS);
	var WHITE_KEY_HEIGHT = height;

	var BLACK_KEY_WIDTH = WHITE_KEY_WIDTH * .75
	var BLACK_KEY_HEIGHT = height * .66

	function DrawRectWithBorder(X, Y, Width, Height, Color1, Color2) {

		//draw border
		ctx.fillStyle = Color1;
		ctx.fillRect(X, Y, Width, Height);

		//draw inside
		ctx.fillStyle = Color2;
		ctx.fillRect(X+1,Y+1, Width-2, Height-2);

	}

	// draws a back key, based on whiteKeyIndex, where 0 <= WhiteKeyIndex < 52
	function drawBlackKey(whiteKeyIndex, shouldBeRed = false) {

	  if (!shouldBeRed) {

		C1 = "rgb(0,0,0)";			// black
		C2 = "rgb(50,50,50)";		// ??

		DrawRectWithBorder(X_BORDER + ((whiteKeyIndex+1) * WHITE_KEY_WIDTH) - (BLACK_KEY_WIDTH / 2), Y_BORDER, BLACK_KEY_WIDTH, BLACK_KEY_HEIGHT, C1, C2);

	  }
	  else {

		C1 = "rgb(0,0,0)";			// black
		C2 = "rgb(255,0,0)";		// red

		DrawRectWithBorder(X_BORDER + ((whiteKeyIndex+1) * WHITE_KEY_WIDTH) - (BLACK_KEY_WIDTH / 2), Y_BORDER, BLACK_KEY_WIDTH, BLACK_KEY_HEIGHT, C1, C2);

	  }

	 }

	function DrawWhiteKey(WhiteKeyIndex, shouldBeRed = false) {

	  if (!shouldBeRed) {

			C1 = "rgb(0,0,0)";			// lback
			C2 = "rgb(255,255,255)";	// white

			DrawRectWithBorder(X_BORDER + (WhiteKeyIndex * WHITE_KEY_WIDTH), Y_BORDER, WHITE_KEY_WIDTH, height, C1, C2);

	   } else {

			C1 = "rgb(0,0,0)";			// black
			C2 = "rgb(255,0,0)";		// red

			DrawRectWithBorder(X_BORDER + (WhiteKeyIndex * WHITE_KEY_WIDTH), Y_BORDER, WHITE_KEY_WIDTH, height, C1, C2);

	   }
	}

	function keyType (isBlack,  White_Index) {
		this.isBlack 		= isBlack;
		this.White_Index 	= White_Index
	}

	function AbsoluteToKeyInfo(AbsoluteNoteNum) {

		var KeyLookupTable = new Array(TOTAL_KEYS);

		KeyLookupTable[0]  = new keyType(false, 0);			// a
		KeyLookupTable[1]  = new keyType(true,  0);			// a#
		KeyLookupTable[2]  = new keyType(false, 1);			// b
		base = 3;

		NumOctaves = 8
		for (counter=0; counter<NumOctaves; counter++) {
			octave_offset = 7 * counter;

			KeyLookupTable[base+0]  = new keyType(false, octave_offset+2); // c
			KeyLookupTable[base+1]  = new keyType(true,  octave_offset+2); // c#
			KeyLookupTable[base+2]  = new keyType(false, octave_offset+3); // d
			KeyLookupTable[base+3]  = new keyType(true,  octave_offset+3); // d#
			KeyLookupTable[base+4]  = new keyType(false, octave_offset+4); // e
			KeyLookupTable[base+5]  = new keyType(false, octave_offset+5); // f
			KeyLookupTable[base+6]  = new keyType(true,  octave_offset+5); // f#
			KeyLookupTable[base+7] =  new keyType(false, octave_offset+6); // g
			KeyLookupTable[base+8] =  new keyType(true,  octave_offset+6); // g#
			KeyLookupTable[base+9] =  new keyType(false, octave_offset+7); // a
			KeyLookupTable[base+10] = new keyType(true,  octave_offset+7)  // a#
			KeyLookupTable[base+11] = new keyType(false, octave_offset+8); // b

			base += 12;
		}

		return KeyLookupTable[AbsoluteNoteNum];
	}


	// just draw in all the white keys to begin with...
	for (i = 0; i < NUM_WHITE_KEYS; i++) {
		DrawWhiteKey(i, false);
	}


	// now draw specially white keys that need to be red...
	// just loop through all the RedKeyArray
	for (index = 0; index <= TOTAL_KEYS; index++) {
		// and if we find any white keys that are supposed to be red, then draw them in red...
		if (RedKeyArray.includes(index)) {
			KeyLookup = AbsoluteToKeyInfo(index);
			if (!KeyLookup.isBlack)
				DrawWhiteKey(KeyLookup.White_Index, true);
		}
	}

	// draw in lowest a# manually (making sure to draw it red if it should be)
	LowestShouldBeRed = RedKeyArray.includes(1);
	drawBlackKey(0, LowestShouldBeRed);

	// now draw all the rest of the black keys...
	// loop through all 7 octaves
	numOctaves = 7;
	curWhiteNoteIndex = 2;

	for (octave=0; octave<numOctaves; octave++) {
		// and draw 5 black notes per octave...
		for (i=0; i<5; i++) {
			drawBlackKey(curWhiteNoteIndex, false);
			if (i == 1 || i == 4)
				curWhiteNoteIndex +=2;
			else
				curWhiteNoteIndex += 1;
		}
	}


	// now draw specially black keys that need to be red...
	// just loop through all the RedKeyArray
	for (index = 0; index <= 88; index++) {
		// and if we find any black keys that are supposed to be red, then draw them in red...
		if (RedKeyArray.includes(index)) {
			KeyLookup = AbsoluteToKeyInfo(index);
			if (KeyLookup.isBlack)
				drawBlackKey(KeyLookup.White_Index, true);
		}
	}

}
(sorry the code looks sort of ugly with all the unnatural line-breaks introduced into the code as part of posting it into this blog post.)
The .HTML code below shows an example of how to use the library:
 <!DOCTYPE html>

<html>
<body  onload="IllustrateKeyboardSymmetry()";>

<canvas id="canvas" width="650" height="72">Your browser does not support the HTML5 canvas tag.</canvas>

<script src="js/keyboard.js"></script>

<script>

	Middle_D = 41;
	CurInterval = 0;
	KeyNumber = 85;

	function DrawCMajorChord() {

		var canvas = document.getElementById("canvas");
		var ctx = canvas.getContext("2d");

		RedKeys = [0, 39, 43, 46];

		DrawKeyboard(ctx, RedKeys);
	}

	function PlayChromaticScale() {

		function PlayChromaticScaleCode() {

			var canvas = document.getElementById("canvas");
			var ctx = canvas.getContext("2d");

			RedKeys = [KeyNumber];
			DrawKeyboard(canvas, RedKeys);

			if (KeyNumber != 87) KeyNumber += 1; else KeyNumber = 0;

		}

		PlayChromaticScaleCode();
		setInterval(PlayChromaticScaleCode, 250);

	}

	function IllustrateKeyboardSymmetry() {

		function IllustrateKeyboardSymmetryCode() {

			var canvas = document.getElementById("canvas");
			var ctx = canvas.getContext("2d");

			RedKeys = [Middle_D - CurInterval, Middle_D + CurInterval];
			DrawKeyboard(canvas, RedKeys);

			if (CurInterval != 20) CurInterval += 1; else CurInterval = 0;

		}

		IllustrateKeyboardSymmetryCode();
		setInterval(IllustrateKeyboardSymmetryCode, 750);

	}


</script>

</body>
</html>
If I have time in the future, I will give a run-down on how the JS code works, but obviously it is pretty simple. (The idea of this post isn’t to be a JS tutorial, it is to illustrate the programming mindset.)
But just in general: the idea of the code is to draw the black and white keys of a piano keyboard in the correct order with the correct arrangement of white and black keys in a purely programmatic fashion. Additionally, there is another requirement to draw some of the keys (either white or black) in red, to highlight them.
The easiest way I found to do that is to just follow this algorithm that I came up with:
- Draw all 52 white keys
- Draw any white key that should be red in red [over top]
- Draw all black keys
- Draw any black key that should be red in red [over top]
Additionally, the idea is to call the DrawKeyboard() method once per frame, which redraws the entire keyboard [using the above algorithm] on each call.
So by looking at the code above, for example, the PlayChromaticScale() method just calls DrawKeyboard repeatedly (using the Javascript function setInterval()), just changing the value in RedKeys[] each time.
The canvas below shows the output:
WordPress
Finally, having developed the library I needed, the final question was: “so how the heck should I get this into WordPress?“
(My websites are implemented using the WordPress platform, which I am no expert in by a long shot. As a matter of fact, learning to use and customize my sites by creating the necessary .PHP, .CSS, .HTML, and .JS is fast becoming a major impetus to my continuing education with modern computer programming topics; up till now, I mostly focused on low-level and algorithmic programming, and tended to “look down” on web programming all together! Oh, how times change!)
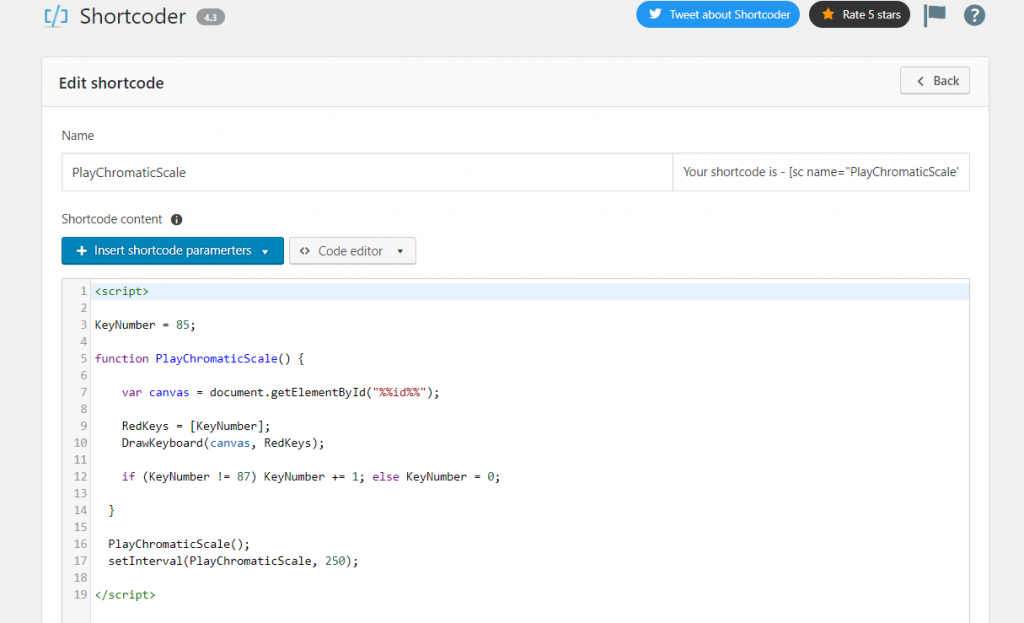
Anyway, a quick web search revealed the amazing WordPress plugin called Shortcoder, which is a beautifully designed way to insert javascript code straight into WordPress:
For example, the canvas elements on this page are inserted into the text for this post using code like this:

Which just call ShortCoder functions I created that contain the java script I developed:
Conslusion
This blog post has been a lot of fun to write, because it chronicled my thought process and development steps to create an interesting and useful piece of digital content — an animated piano keyboard — created entirely programmaticly.
While writing the JS library above, as well as this post itself, it occurred to me that often I was putting the cart before the horse with trying to learn new programming languages and platforms: basically, I just read books or articles about programming topics, but never really tried to use utilize the languages themselves.
I now realize that my approach was entirely backwards. Instead, I should have looked for interesting projects to implement, and then set myself
towards pragmatically acquiring the skills I needed.
The way I am looking at the world is changing, and I am very happy to report that I am starting to actively achieve my goal of becoming an active producer instead of consumer of content.
So for sure I can say, programming is a very amazing skill to work on developing because it empowers us to engineer our own solutions — and to become the creators we all long to be.
Next Steps
- View the Github repository for this library.